
Create Plugin Action in Microsoft Copilot Studio by using Power Platform Pre-Built Connectors
-
 15 March 2024
  Copilot,Microsoft Copilot
-
 Editorial Team
In this article, we will learn how to create a Copilot Assistant and how you can integrate it with the Power Platform’s pre-built connectors.
Let’s dive into it.
What Is a Power Automate Connector?
Power Automate connectors act as bridges between Microsoft Power Automate, Power Apps, Azure Logic Apps, and various external services and applications, allowing seamless communication and enabling the creation of apps and workflows. By using connectors, you can connect your accounts and utilize a set of prebuilt actions and triggers to build apps and create workflows.
For example: A Copilot could use connectors to fetch weather forecast information.
So, Let’s Build our First Plugin Action
Before starting with the Plugin, we need to create your “Copilot Assistant”. Please follow the steps below to create your first Microsoft Copilot Studio assistant.
- Go to the Microsoft Copilot Studio introduction website using a supported browser (Microsoft Edge, Chrome, or Firefox).
- Sign in with your work email address (personal Microsoft accounts are currently not supported).
- Once signed up, you’ll land on the home page.
- Click “Create a Copilot” to start the wizard.
Configure Your Copilot:
- Give your Copilot a descriptive name (e.g., “Copilot Assistant”).
- Choose the language you want your Copilot to speak.
- Optionally, add a URL to boost conversations with generative answers.
- You can also customize your Copilot by selecting an icon to represent your business scenario.
- Click “Create”.
- Creating your first Copilot in a new environment may take a few minutes.
- After a few minutes, Copilot Studio will launch your first “Own Copilot Assistant”, as you can see in the attached snapshots below.

As you have launched your first Copilot Assistant, you now need to create your first plugin action by following the steps below.
Information with a custom connector or a Power Platform connector that we want to get in our co-pilot to not only return information but maybe even perform some actions for us well that’s where we want to use plugin App action.
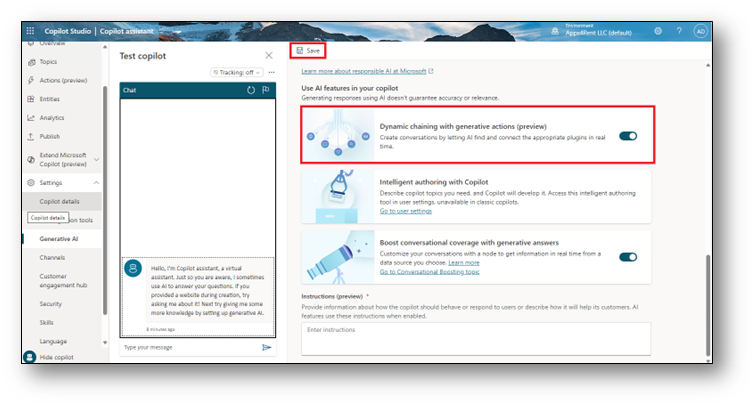
- However, before we can start using you need to enable one setting in the Generative AI Section.
- “Click” on Settings on the left side of the panel.
- Once you click on settings you need to select the “Generative AI” option. You can see this in the below picture.

- So, if we scroll down to the bottom page, you must ensure that Generative Answers are enabled, and you can save it. as you can see in the snapshot below.

- Select the Action (preview) option from the left side of the panel.
- After that select Add an action (preview) button, as you can see in the below snapshot.

- In the search bar type “Current Weather” and hit the search button
- Once you click the search button, you will see the ‘Get Current Weather Connector’ option appears. Select that choice, as shown in the screenshot below.

- The Connector Provisioning page will appear.

- Once the provisioning has been completed, click Next.

How to Configure Your Connector?
Perform the following steps to configure your connector:
- Go to the Input (2) section and select Edit > Units Section > How will the Copilot fill this input? This option requires you to select “Set as a Value” > Confirm > Value > Enter or select value as a “C” and leave the rest of the settings as default, then click the “Save” button.
- Go to the Output (0) section and select Edit> add outputs and select > “CONDITION.” and leave the rest of the settings as default, hit the “Save” button.
- After making all the configurations, click the Finish button.
- Once you’ve clicked the Finish button, the page below will appear. Refer to the below screenshot.

- Once the request has been processed, as shown below, your Pre-Built Weather Forecast connector will be live and appear in the action list.

Now Let’s Prompt the Copilot About the Weather Forecast
The prompt given to Copilot: Weather Conditions for New York
Output given by Copilot: Based on your given prompt Copilot Assistant will respond, as you can see in the below snapshot.

This represents you’ve properly configured your weather connector and copilot.
Prompt II given to Copilot: What is the current weather in Washington?
Output given by Copilot: Based on your given prompt, you see the output below.

Benefits of Power Platform Pre-Built Connectors in Microsoft Copilot Studio
- Enhanced Functionality
- Connectors act as a bridge between Microsoft Copilot Studio and external services or applications.
- They allow you to connect your accounts and utilize a set of prebuilt actions and triggers to build apps and workflows.
- With connectors, you can automate tasks by accessing various services both within the Microsoft ecosystem and outside it.
- Wide Range of Services
- Connectors cover a broad spectrum of services, including:
- Microsoft Services: Office 365, SharePoint, and Dynamics 365.
- Seamless Experience
- Copilot Studio integrates with various Microsoft technologies, including Power Virtual Agents, and Azure OpenAI Studio, it offers over 1,100 prebuilt connectors for seamless connection to all business data.

Apps4Rent – Tier 1 Office 365 Cloud Solution Provider
Copilot integrates with all your favorite Microsoft apps

Get started with
Microsoft Copilot today!


