How to Install Microsoft Copilot on Mac?
-
 Last updated: 17 December 2025
 Sales and Billing
-
 Editorial Team
Feeling envious of Windows users enjoying seamless Microsoft Copilot integration? Well, Mac enthusiasts, your time has come! – now you can also tap into the AI assistance on your Apple device! Just by downloading and setting up, Microsoft Copilot can be live on your Mac.
So, without further ado, let’s dive into the steps of the Copilot installation process on Mac
Methods for Installing Microsoft Copilot on Mac
Method 1: App Store

If you have an M1 or M2 Mac, you can download the Copilot app from the App Store. Just log in with your Apple ID and install it like any other program. You’ll then be able to access Copilot through the Applications folder or by Spotlight search.
While this integration is functional, it might lack some advanced features. If you prefer a setup similar to Copilot on Windows, where you can initiate it with a simple button combination, you can achieve this using a combination of Automator and keyboard shortcuts in your Mac’s settings.
Here’s How to Set a Dedicated Keyboard Shortcut for Launching Copilot:
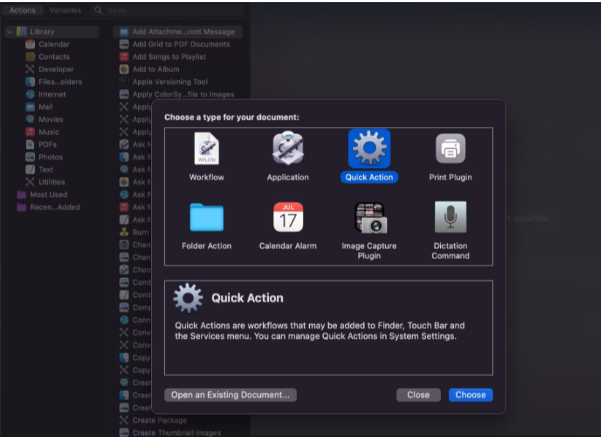
- Open Automator and choose “Quick Action” as the document type.
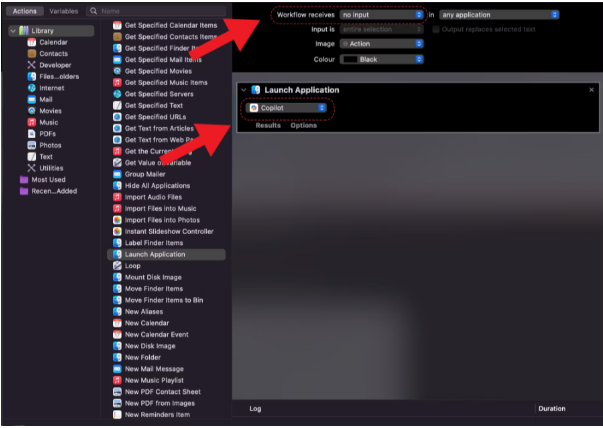
- Select “Launch Application” from the actions list. Where it says “Receive no input”, choose “Copilot” from your Applications.
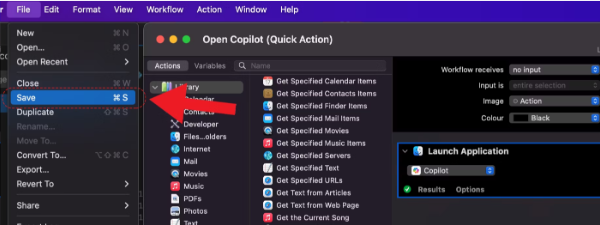
- Save the automation, by giving it a name like “Launch Copilot”.
- Go to Settings > Keyboard > Shortcuts.
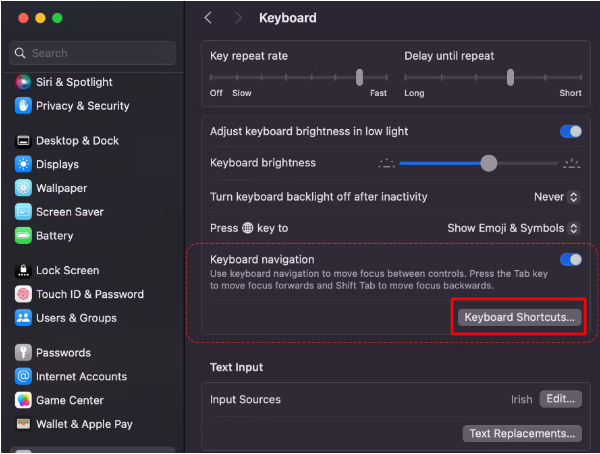
- Under the Services section, find your new “Launch Copilot” action.
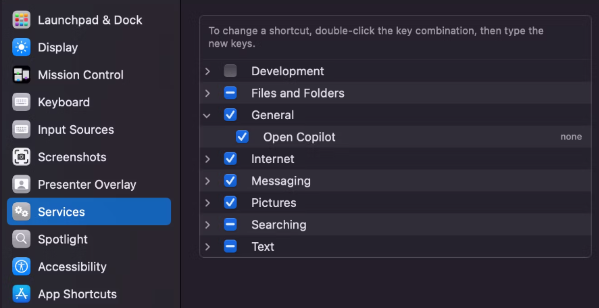
- Assign it a keyboard shortcut that doesn’t conflict with others, such as Shift-Command-C.
- Close System Preferences/Settings.
Now whenever you press the assigned shortcut, Copilot will instantly launch, ready for use. No more clicking through folders – just run the AI assistant with a keystroke from anywhere in macOS!
Method 2: Safari Web Apps
If you’d rather avoid using Automator or apps, store there’s an easy way to access Copilot directly from your Mac dock.
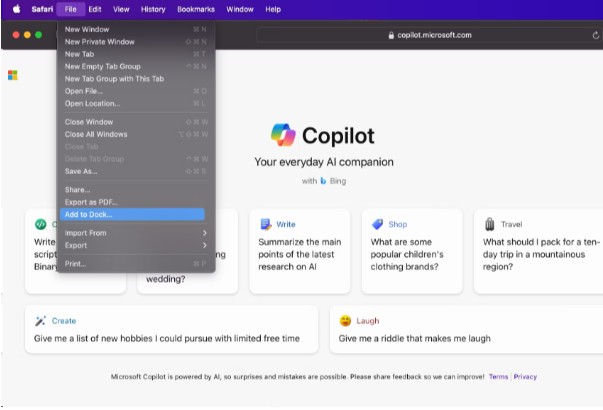
- First, open the Copilot website in Safari.
- Then from the menu bar, select File > Add to Dock.
- Accept the default icon and name options.
You’ll now see the Copilot icon sitting in your dock, ready for one-click access. While it’s essentially just a Safari tab wrapped as an app, it functions identically to a normal program from the dock.
This dock method skips any complex setup steps. Simply click the icon to instantly open Copilot. While you can’t assign a dedicated keyboard shortcut for launching it anywhere on your Mac, having it front and center in the dock streamlines the process compared to navigating folders each time. For casual Copilot use, adding it to your dock provides a hassle-free way to run the AI assistant with a single click.
Setting Up Copilot on Mac for Developers
-
System Requirements
To ensure smooth installation and optimal performance, it’s essential to check if your Mac meets the minimum system requirements for Microsoft Copilot. Currently, Copilot is compatible with macOS 10.14 Mojave and above.
Additionally, make sure your Mac has sufficient disk space and RAM to accommodate Copilot’s computational demands.
-
Setting Up Your Development Environment
Before installing Copilot, it’s recommended to set up your development environment properly. Ensure that you have installed and configured your preferred code editor or integrated development environment (IDE) on your Mac. Popular choices include Visual Studio Code, Atom, and Sublime Text.
-
Installing Visual Studio Code
Microsoft Copilot seamlessly integrates with Visual Studio Code, a lightweight yet powerful code editor loved by developers worldwide.
To install Visual Studio Code on your Mac, follow these simple steps:
- Visit the official Visual Studio Code website.
- Download the macOS installer package.
- Open the downloaded package and follow the on-screen instructions to complete the installation process.
-
Installing Microsoft Copilot Extension
Once Visual Studio Code is installed, it’s time to add the Microsoft Copilot extension.
Follow these steps to install the Copilot extension:
- Launch Visual Studio Code on your Mac.
- Navigate to the Extensions view by clicking on the square icon in the sidebar or pressing Cmd+Shift+X.
- Search for “Microsoft Copilot” in the Extensions Marketplace.
- Click on the “Install” button next to the Copilot extension.
- Wait for the installation to complete, and then restart Visual Studio Code if prompted.
-
Configuring Microsoft Copilot
After installing the Copilot extension, you may need to configure it according to your preferences.
Access the extension settings by following these steps:
- Click on the gear icon located at the bottom left corner of Visual Studio Code.
- Select “Extensions” from the dropdown menu.
- Find “Microsoft Copilot” in the list of installed extensions and click on it.
- Adjust the settings as per your requirements, such as enabling/disabling certain features or customizing keybindings.
-
Testing Microsoft Copilot
Once configured, it’s time to put Microsoft Copilot to the test! Open a new or existing code file in Visual Studio Code, and start typing. You’ll notice Copilot’s intelligent suggestions and auto-completions appearing as you code, helping you write faster and more accurately.
Conclusion
Microsoft Copilot can easily be installed and set up for use on Mac. Whether you download the dedicated app, add it to your dock through Safari, or create a keyboard shortcut using Automator, there are straightforward options to bring Copilot’s powerful AI assistance to your Apple device. With just a few clicks, you can start harnessing its intelligent code completions, documentation recommendations, and other aids directly within your preferred coding editor.
While Mac integration may not be as seamless as on Windows, Copilot remains highly accessible for Mac users looking to boost their productivity. So don’t hesitate – follow the simple steps outlined to start enjoying Copilot’s benefits on your Mac today.
FAQs on How to Install Microsoft Copilot on Mac
- Can I use Copilot if I have an older Mac without an M1/M2 chip?
Yes, while the App Store method only works on Apple Silicon Macs, you can still download and install the Copilot desktop app on Intel-based Macs. - Can I customize Copilot’s appearance or keyboard shortcut?
Within the Copilot app preferences, you can choose between light and dark themes. You can also reassign the keyboard shortcut if needed when creating the Automator action. - Is Microsoft Copilot free to use on Mac?
Yes, Microsoft Copilot is free to use for individual developers and available as an extension within Visual Studio Code. - Can I use Copilot with other code editors besides Visual Studio Code?
Currently, Copilot is primarily designed for use within Visual Studio Code, but there may be future compatibility with other editors.