
How to Increase Mailbox Size in Office 365
-
 21 October 2025
  Email,Office 365
-
 Written by Editorial Team
Running out of mailbox space is a common headache for Office 365 users, leading to bounced emails and missed communications. If you’re searching for how to increase mailbox size in Office 365, you’ve come to the right place. This comprehensive, step-by-step guide will walk you through all the available methods—from using the Admin Center and PowerShell to enabling archiving—to effectively manage and expand your mailbox storage. We’ll also cover best practices and troubleshooting common issues to ensure a smooth process.
Why You May Need to Increase Mailbox Size
Modern workflows rely heavily on email for communication, file sharing, and record-keeping. As your business grows, so does the volume of data passing through user mailboxes. Common triggers for needing more space include receiving large attachments, long email retention periods for compliance, and a growing number of correspondences. When a mailbox is full, users can no longer send or receive messages, which directly impacts productivity and can lead to lost business opportunities. Proactively managing the size of a mailbox in Office 365 is crucial for maintaining seamless business operations.
Default Mailbox Size Limits in Office 365 Plans
Before learning how to increase the mailbox size in Office 365, it’s essential to understand the default limits, which vary by subscription plan. Microsoft sets these limits to manage overall system performance.
Here’s a general overview of standard mailbox sizes (as of the latest updates, subject to change by Microsoft):
- Microsoft 365 Business Basic/Standard/Premium: Typically 50 GB per user mailbox.
- Office 365 E1: 50 GB.
- Office 365 E3/E5: 100 GB.
It’s important to note that while you cannot directly increase a user’s mailbox beyond the hard limit of their plan (e.g., 100 GB for E3), you can use online archiving to provide virtually unlimited storage. We will explore this later in the guide.
When planning mailbox size increases, consider whether you are also undergoing a migration. Our guides on how to migrate IMAP mailboxes to Office 365 and our comprehensive POP3 to Office 365 migration guide offer critical insights to align mailbox sizing with migration best practices.
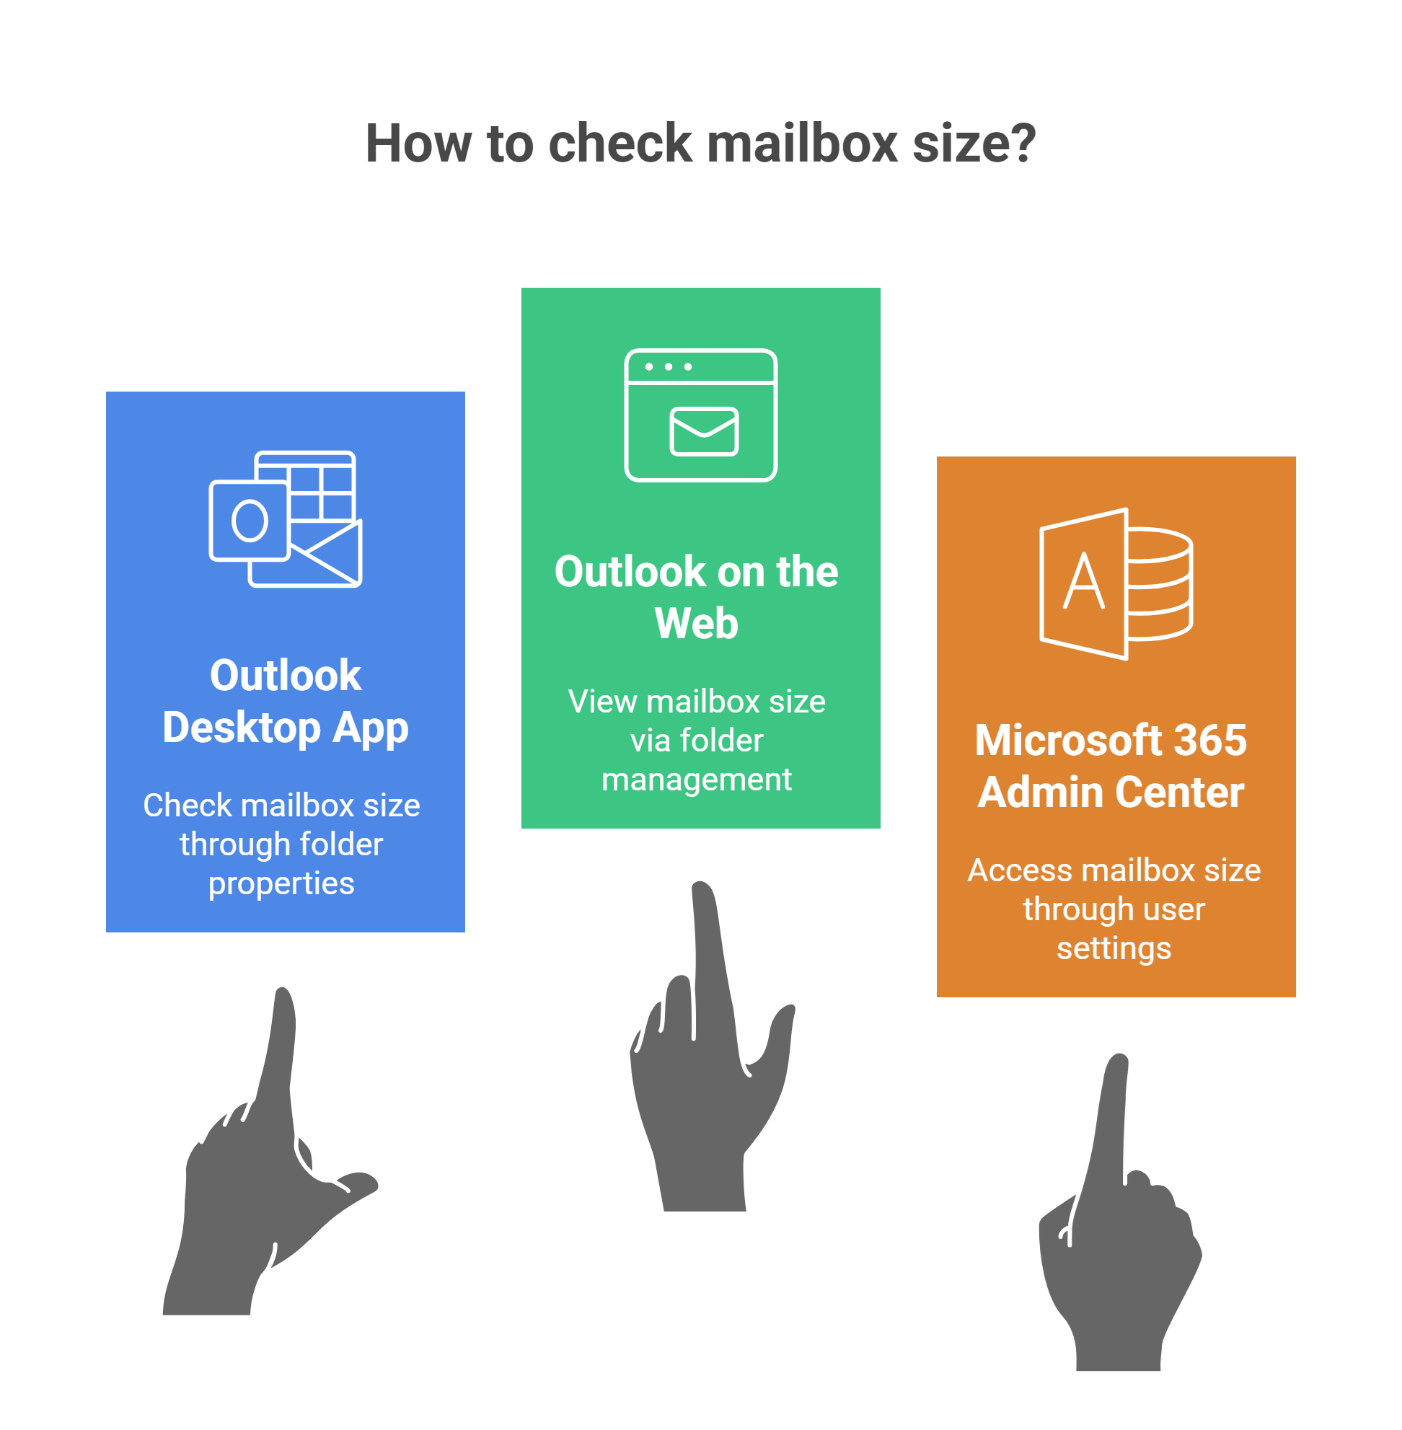
How to Check Your Current Mailbox Size in Outlook & Admin Center
Before taking action, check how much space you’re currently using.
In Outlook Desktop App:
- Right-click on your mailbox folder in the folder pane.
- Select Data File Properties.
- Click Folder Size. This will show the size of your mailbox on the server.
In Outlook on the Web (OWA):
- Click on your mailbox in the folder list.
- Right-click and select Manage folders.
- Your total size will be displayed at the bottom.
In the Microsoft 365 Admin Center:
- Go to the Admin Center and navigate to Users > Active Users.
- Select the user whose mailbox size you want to check.
- Click on the Mail tab. The mailbox usage, including current size and quota, will be displayed.
Methods to Increase Mailbox Size in Office 365
There are several strategies for how to increase user mailbox size in Office 365. The best method depends on your budget, compliance needs, and technical comfort.
Method 1: Upgrade to a Higher Microsoft 365 Plan
The most straightforward way to get more primary mailbox storage is to upgrade your subscription. For example, moving from an E1 plan (50 GB) to an E3 plan (100 GB) instantly doubles the available space. This method requires no technical configuration but does involve a higher licensing cost.
Method 2: Enable Archive Mailbox in Office 365
The Online Archive is a powerful feature that provides users with a secondary mailbox for storing older emails. It’s the most common and efficient solution for managing long-term storage.
To enable it via the Admin Center:
- In the Microsoft 365 Admin Center, go to Admin Centers > Exchange.
- Navigate to Recipients > Mailboxes.
- Select the user, and in the details pane, under In-Place Archive, click Enable.
- The archive mailbox will be provisioned, and users can access it via Outlook or OWA.
Method 3: Increase Mailbox Size via Exchange Admin Center
While you can’t exceed your plan’s maximum, you can adjust the warning thresholds and sending/receiving blocks for users within their limit.
Steps for increasing mailbox size in Office 365 admin center (EAC):
- In the Exchange Admin Center, go to Recipients > Mailboxes.
- Double-click on the user’s mailbox you want to modify.
- Go to Mailbox Usage > More options.
- Click Customize the settings for this mailbox.
- Here, you can increase the values for Issue warning at (GB), Prohibit send at (GB), and Prohibit send and receive at (GB) to values just below your plan’s maximum (e.g., 49 GB and 50 GB for a 50 GB mailbox).
Method 4: Increase Mailbox Size in Office 365 using PowerShell
For bulk operations or more granular control, PowerShell is the preferred tool.
- Connect to Exchange Online PowerShell: Open Windows PowerShell as an admin and run:
Connect-ExchangeOnline - Set Mailbox Quotas: Use the Set-Mailbox cmdlet. The following command sets the quotas for a specific user:
Set-Mailbox -Identity “user@yourdomain.com” -IssueWarningQuota 49GB -ProhibitSendQuota 49.5GB -ProhibitSendReceiveQuota 50GB
This is a key technique for administrators who need to know how to increase mailbox size in Office 365 programmatically.
Method 5: Free Up Space by Archiving or Deleting Old Emails
Sometimes, the best solution isn’t to add space but to clean up existing clutter. Encourage users to:
- Delete unnecessary emails with large attachments.
- Empty the “Deleted Items” and “Junk Email” folders regularly.
- Use the “Cleanup Tools” in Outlook to archive old items to a local PST file (note: this is different from the Online Archive).
How to Increase Archive Mailbox Size in Office 365
By default, an online archive mailbox starts at 100 GB. However, for users with an Office 365 E3 or E5 license who require how to increase archive mailbox size in Office 365 beyond this, you can enable “Auto-Expanding Archiving.”
- This feature is enabled automatically when a user’s archive mailbox reaches 90 GB.
- It creates additional archive storage space as needed, providing effectively unlimited storage.
- To prepare, ensure the user has an E3 or E5 license and that the regular archive is enabled. The system will handle the rest automatically when the threshold is met.
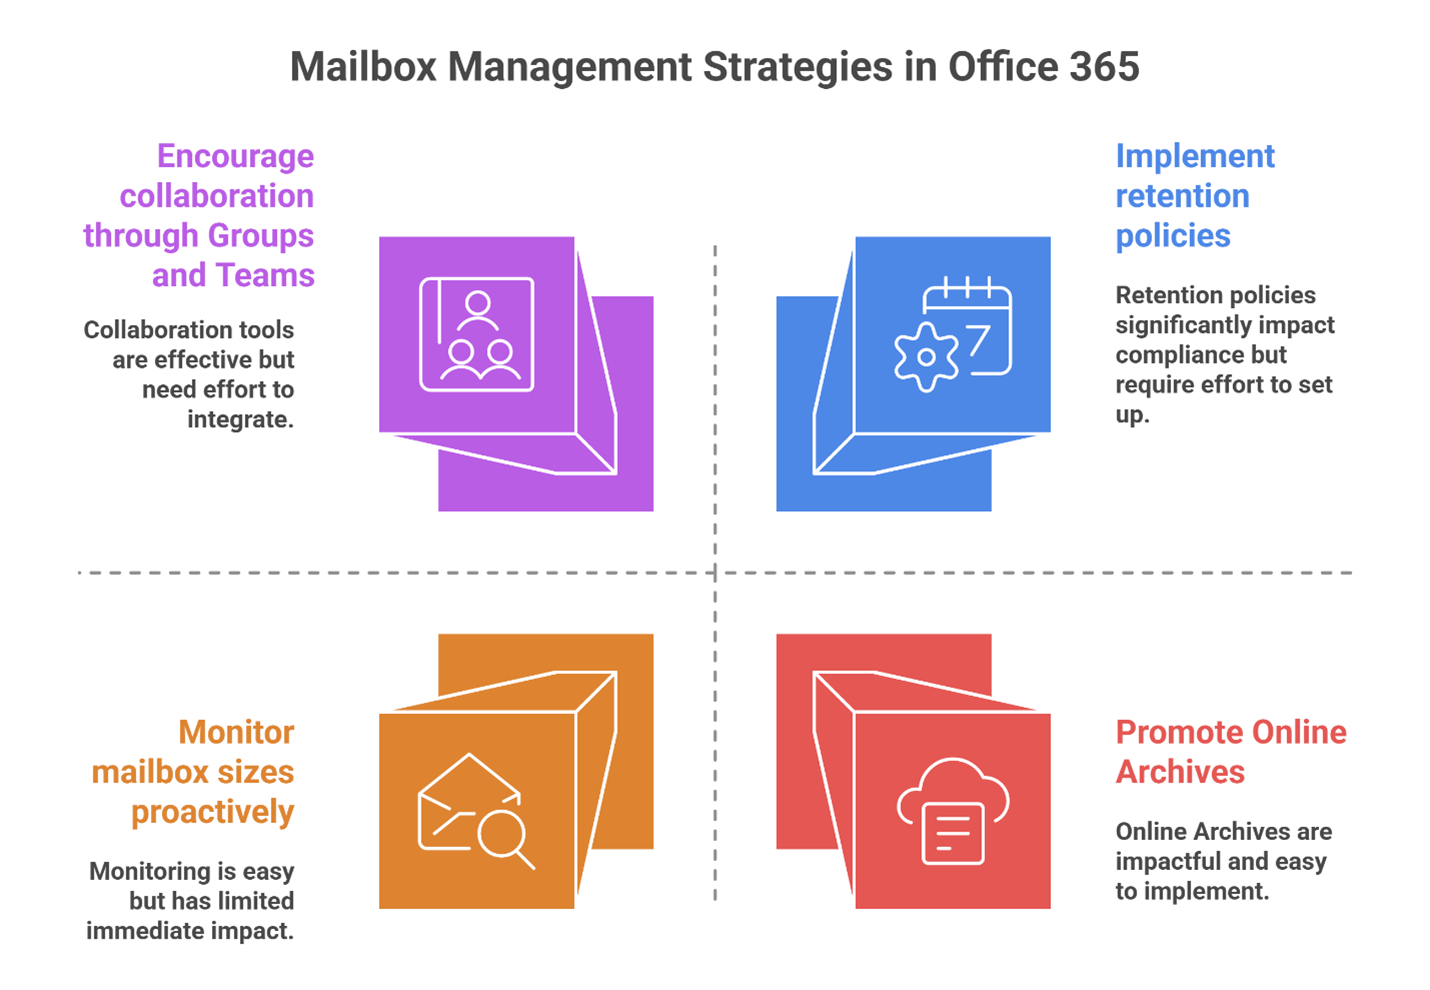
Best Practices for Managing Mailbox Storage
While knowing how to increase mailbox size in Office 365 is essential, a proactive approach to storage management is far more effective. Simply expanding quotas is a reactive measure; implementing strategic best practices prevents problems from recurring and fosters a more organized email environment. By integrating the following strategies, you can optimize performance and reduce the frequency of storage-related tickets.
- Promote the Use of Archives: Cultivate a culture where users routinely move older, non-essential emails to their Online Archive. This keeps the primary mailbox lean and performant for current communications.
- Implement Retention Policies: Leverage Microsoft 365’s compliance features to automatically delete or archive emails after a predefined period. This systematic approach ensures data hygiene and compliance without relying on manual user effort.
- Use Groups and Teams for Collaboration: Actively encourage shifting file sharing and lengthy group conversations from email to dedicated platforms like Microsoft Teams or SharePoint. This dramatically reduces the burden of large attachments and long threads on individual user mailbox size in Office 365.
- Monitor Proactively: Don’t wait for help desk calls. Schedule regular reviews of mailbox sizes within the Admin Center to identify users approaching their limits and take action before they are unable to send emails.

Common Issues When Increasing Mailbox Size (and Fixes)
Even when you follow the correct steps for how to increase the size of a mailbox in Office 365, you might encounter some common hurdles. Understanding these potential issues and their solutions will save time and frustration, ensuring your changes are implemented smoothly and effectively.
- “Prohibit Send” Limit Reached: This is the most frequent alert users encounter. They can still receive mail, but are blocked from sending. The immediate fix is to have the user free up space by deleting old emails or moving them to the archive. As an admin, you can also adjust their warning and prohibit quotas, as detailed in Methods 3 and 4.
- PowerShell Command Fails: If your command to increase mailbox size in Office 365 using PowerShell doesn’t execute, first confirm you are properly connected to the Exchange Online PowerShell module. Second, verify that your admin account has the required permissions, such as the Recipient Management role.
- Changes Not Reflecting Immediately: After modifying quotas, allow up to 60 minutes for the changes to propagate fully across Microsoft’s datacenters. A delay does not necessarily mean the action failed.
- Archive Not Appearing in Outlook: If a user’s Online Archive mailbox isn’t visible in their Outlook client, a simple restart of the application often resolves the issue. Also, confirm that the user is running a supported version of Outlook (2010 or later) for the feature to be available.
How O365CloudExperts (Apps4Rent) Can Support Increasing Your Mailbox Size
While the methods above provide a roadmap for expanding mailbox capacity, true operational efficiency is achieved when your IT resources are focused on innovation, not ongoing administration. This is where expert partnership adds immense value. O365CloudExperts, powered by Apps4Rent – a recognized Microsoft Solutions Partner – provides comprehensive solutions to manage these complexities for you.
We simplify the entire process. Whether you are setting up a new tenant through our available Office 365 plans or consolidating your environment through our professional Office 365 migration services, our expertise ensures a seamless deployment. Beyond initial setup, our team offers ongoing support for all aspects of the platform, including efficiently managing mailbox size limitations and other administrative tasks. We handle the technical backend, allowing you to benefit from a fully optimized environment without the administrative overhead, so you can focus entirely on your core business objectives.
FAQs on Increasing Mailbox Size in Office 365
-
What is the default mailbox size limit in Office 365?
The default mailbox size varies by plan. Common plans like Business Standard and E1 offer 50 GB, while E3 and E5 plans offer 100 GB for the primary mailbox.
-
How do I increase the mailbox size in Office 365 Admin Center?
You can adjust warning and prohibit thresholds within the plan’s limits. Navigate to Exchange Admin Center > Recipients > Mailboxes, select a user, and customize the quotas under Mailbox Usage settings.
-
How to increase the archive mailbox size in Office 365?
For E3/E5 users, enable Auto-Expanding Archiving, which automatically adds storage as the 100 GB archive fills up. This is the primary method for how to increase the online archive mailbox size in Office 365.
-
Can I increase the Outlook mailbox size without upgrading my plan?
You cannot directly increase the hard storage limit (for instance, from 50 GB to 100 GB) without upgrading your subscription plan. However, for businesses seeking a hassle-free solution, Apps4Rent’s 24/7 dedicated support makes adding and managing additional storage space a straightforward and fully supported process.
-
What is the maximum mailbox size in Office 365?
The maximum primary mailbox size is 100 GB (for E3/E5 plans). With Auto-Expanding Archiving, the total storage per user (primary + archive) is effectively unlimited.
Final Thoughts: Taking Control of Your Mailbox
Navigating mailbox limits in Office 365 doesn’t have to be a roadblock to your team’s productivity. Throughout this guide, we’ve walked through the key strategies—from the straightforward clicks within the Admin Center to the more advanced, automated power of PowerShell and the near-limitless potential of the Online Archive. Mastering these tools puts you firmly in control of your digital communication space.
For teams that prefer to offload the technical administration, managed service providers like Apps4rent specialize in handling these exact tasks. Whether you manage it yourself or with expert support, the outcome is the same: a fluid, uninterrupted workflow that keeps your business moving forward.


